
HubIQ to External Apps
Use MQTT to export sensor process values from SITRANS hub IQ to external applications through a customer-managed MQTT broker. Create an export target, define its payload format, and assign sensors to it. Creating a target alone does not start exporting every device's data.
For gateway-to-hub IQ ingestion, see Gateway to HubIQ. The two connections use separate brokers, settings, and credentials.
Prerequisites
- An active Pro Connect subscription that enables MQTT data export and covers the devices you want to export.
- Permission to configure data export targets and device export settings in your company's hub IQ environment.
- A customer-managed MQTT broker reachable from hub IQ over TLS. Unencrypted MQTT connections are not supported.
- Broker credentials and certificates supplied by your broker administrator. hub IQ does not issue these for customer brokers.
- Onboarded sensors that are sending process values to hub IQ.
- A subscriber with permission to read the destination topic, for end-to-end verification.
Step 1: Create an MQTT Target
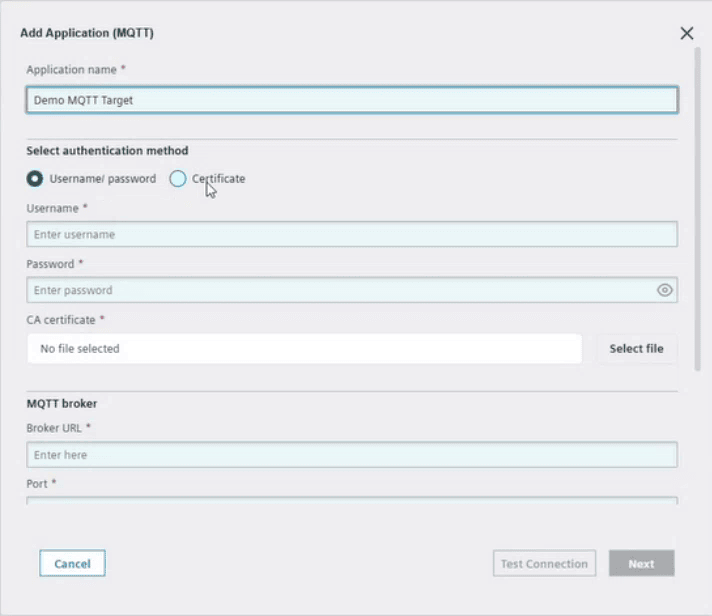
- Open Settings > Data export settings > Applications (MQTT). Some interface versions label the entry Applications (MQTT-Paid).
- Select Add to open Add Application (MQTT).
- Enter an Application name, for example
Demo MQTT Target. - Choose the authentication method and supply the corresponding broker credentials.
| Authentication Method | Required Credentials |
|---|---|
| Username/password | Broker username, password, and broker CA certificate. |
| Certificate | Client private key, client certificate, and broker CA certificate. |
The CA certificate allows hub IQ to verify the customer broker. For certificate authentication, the client certificate and private key identify hub IQ to that broker. Both methods require a secure connection; username/password authentication does not enable unencrypted MQTT.
Do not upload the gateway connection package from the gateway onboarding workflow. Use certificates and credentials issued for your customer broker, and keep private keys and passwords out of shared examples.
Step 2: Configure and Test the Broker Connection
Complete the MQTT broker section of the dialog:
| Setting | Description |
|---|---|
| Broker URL | Your broker's secure MQTT address, for example mqtts://broker.example.com. |
| Port | The TLS port configured on your broker, commonly 8883. |
| Client ID | A unique identifier for this connection, for example hubiq-export-client-01. |
| Topic name | The destination topic, for example customer/process-values. |
| MQTT version | Select an available version supported by your broker, as shown in the dropdown. |
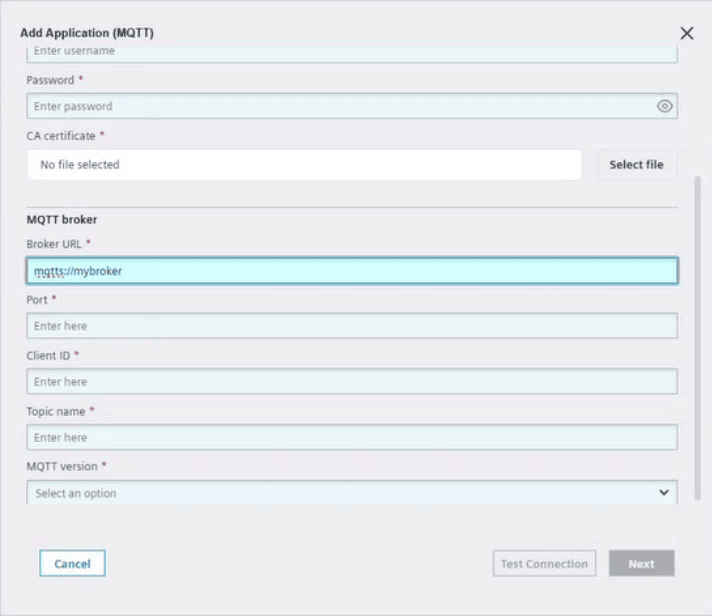
- Select Test Connection.
- If the test fails, correct the broker settings, network access, credentials, or certificates and test again.
- After the test succeeds, select Next to open the payload mapper. A successful test is required to proceed.
Do not reuse a client ID already used by another active connection to your broker. The connection test checks broker connectivity, not sensor assignments or measurement delivery.
Step 3: Define the Export Payload
Payload mapping determines the JSON structure sent to the broker. It is configured per target and sensor type, so the same sensor type can use different formats for different targets. Device-to-target assignment, configured later, determines which sensors export data.
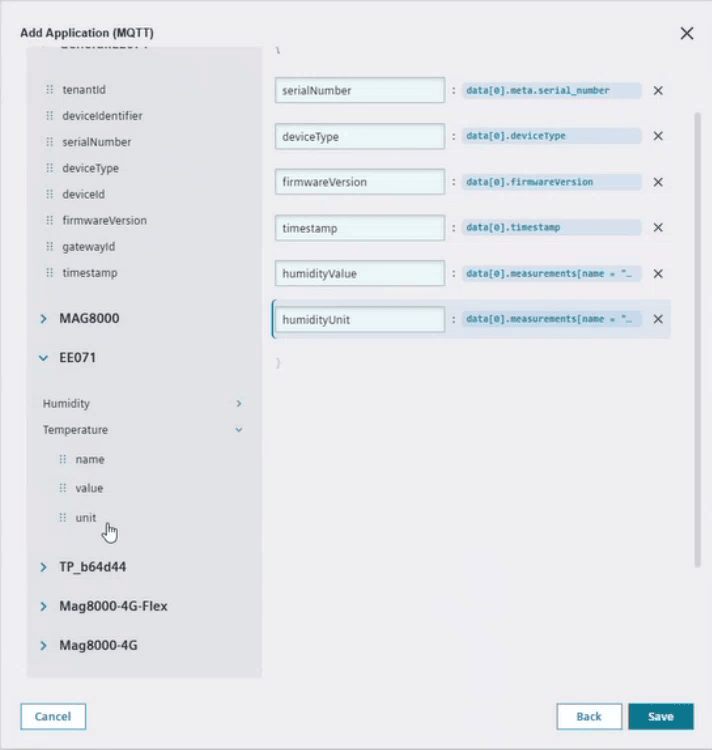
The mapping screen contains a Variables panel and a Builder panel. Sensor types listed in the mapper depend on the devices onboarded in your company.
| Variable Group | Available Data |
|---|---|
| General attributes | Tenant ID, device identifier, serial number, device type, device ID, firmware version, gateway ID, and timestamp. |
| Sensor-specific attributes | Process values configured for the sensor type, such as humidity or temperature, with name, value, and unit. |
If the receiving application accepts the standard hub IQ canonical payload, leave the custom mapping empty. Otherwise:
- Expand the relevant sensor type in Variables.
- Add the required attributes to the Builder using their drag handles.
- Expand a measurement, such as Humidity, and add its value and unit attributes.
- Rename output fields to match the receiving application's contract.
- Use field, Object, or array blocks to arrange the output as needed. For example, place
gatewayIdandtenantIdinside ametaobject. - Repeat for each sensor type that will export through this target.
Example Custom Payload
The following illustrates a custom mapping. The values are examples, not live readings or the default canonical schema.
{
  "serialNumber": "SN-EXAMPLE-001",
  "deviceType": "EXAMPLE-SENSOR",
  "firmwareVersion": "1.0.0",
  "timestamp": "2026-11-04T08:00:00.000Z",
  "humidityValue": 45,
  "humidityUnit": "percent",
  "temperatureValue": 22,
  "temperatureUnit": "celsius",
  "meta": {
    "gatewayId": "GATEWAY-EXAMPLE-001",
    "tenantId": "TENANT-EXAMPLE-001"
  }
}
Review and Save
- Enable Schema preview.
- Check the Output shape for field names, nesting, and selected attributes.
- Disable the preview to make corrections in the builder.
- Select Save to save the target and payload configuration.
- Return to Settings > Applications (MQTT) and confirm that your application appears in the list.
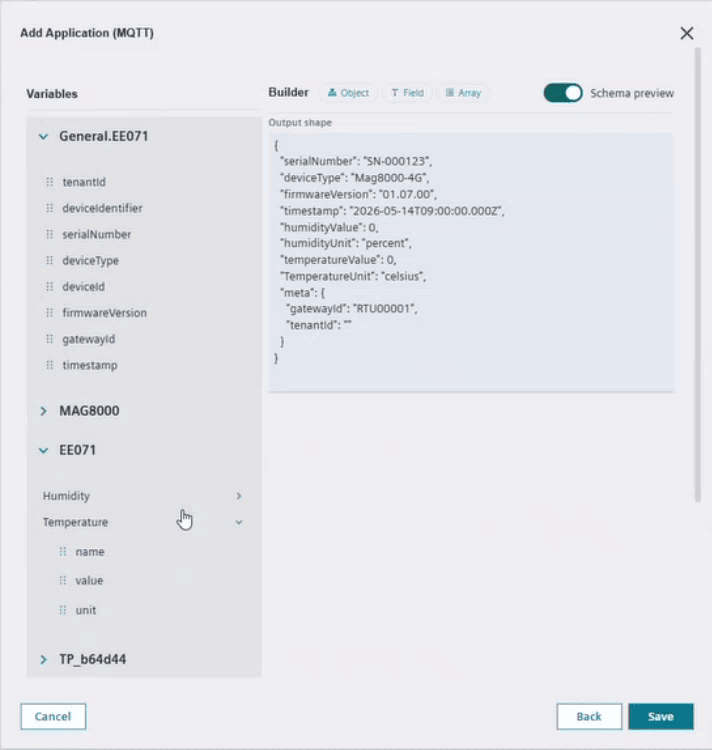
The preview uses example values. It does not confirm that a sensor has published data.
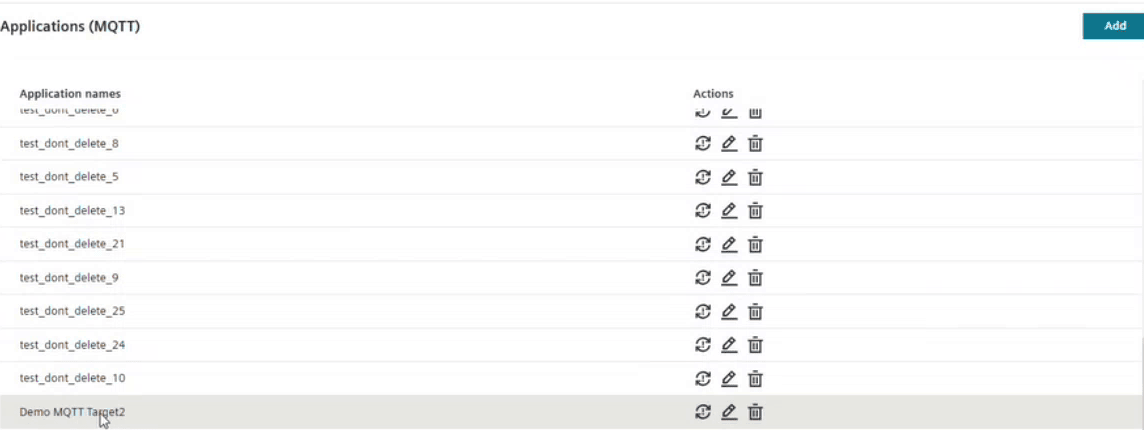
Use the application name you saved when locating your target; the screenshot contains demonstration names.
Step 4: Assign Sensors to the Target
Assign or Remove a Target for One Sensor
- Open the Device list and select a sensor to open its details.
- Open Data export > Applications (MQTT).
- Select the checkbox beside each target to assign, or clear a checkbox to remove an existing assignment.
- Select Save changes.
- Reopen the sensor's export settings and confirm that the selected targets were saved.

Checked targets are assigned to that sensor; unchecked targets are not. The screenshot shows the controls before selection, with unrelated identifying target names masked. Removing an assignment stops export from that sensor to that target. It does not delete the target or change other sensors' assignments.
Assign Targets to Multiple Sensors
- Open the Device list and filter it to find the required sensors.
- Select the sensors' checkboxes.
- Select Setup process data export in the toolbar to open Setup data export.
- Open Applications (MQTT) and select the target or targets to add.
- Select Export to apply the assignments.
- Open an individual sensor's Data export settings to verify the result.
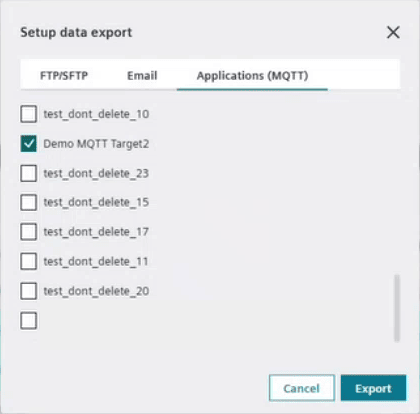
Bulk assignment adds targets to existing assignments. It does not replace them. The bulk dialog does not display each sensor's current assignments, so an unchecked target does not mean that it is unassigned from every selected sensor. To remove an assignment, use the individual sensor's export settings.
If hub IQ reports that the subscription's device allowance is exceeded, review your Pro Connect package and the devices already covered before retrying. Follow the selection limits shown by your current interface when assigning devices in bulk.
Step 5: Verify End-to-End Delivery
- Connect a subscriber to your customer broker with credentials permitted to read the destination topic.
- Subscribe to the exact topic configured in the target.
- Wait for a new process value from an assigned sensor.
- Confirm that a message arrives and that its JSON matches the configured mapping or the canonical payload if no custom mapping was defined.
- Check the sensor identifier and timestamp to confirm that the message belongs to the expected device and measurement.
A successful broker connection test alone does not verify end-to-end delivery.
Manage MQTT Targets
In Settings > Applications (MQTT), use the actions beside the target:
| Action | Use |
|---|---|
| Connection test | Check broker connectivity again, for example after a network or certificate change. |
| Edit | Update the connection profile or payload mapping. Previously saved settings are loaded when you reopen the target. |
| Delete | Delete a shared target that is no longer needed. To stop export for one sensor only, remove its assignment instead. |
After changing connection settings, test the connection again. Select Next to review the payload mappings, check Schema preview, and select Save. Verify delivery from an assigned sensor after saving changes.
Troubleshooting
| Symptom | Checks |
|---|---|
| MQTT export is unavailable | Confirm that your subscription includes Pro Connect MQTT export and that you have configuration permission. |
| Connection test fails | Check the TLS broker URL, port, network access, credentials, CA certificate, client certificate and key if used, and MQTT version. |
| Next is unavailable | Complete a successful connection test before proceeding to payload mapping. |
| Subscription warning appears during assignment | Review your subscription's device allowance and upgrade the package if needed. |
| Test succeeds but no messages arrive | Check sensor-to-target assignments, incoming process values, destination topic, and subscriber permissions. |
| JSON differs from the required format | Edit the mapping for the relevant sensor type on this target, review the preview, and save. |
| Bulk assignment did not remove a target | Bulk assignment is additive. Remove the target from each affected sensor's individual export settings. |